Interestingly enough, most of the families I shoot for have Photoshop on their computers, nice cameras and rather adorable children :) So I thought I would throw together a quick tutorial on how to make your pictures look their best using Photoshop. This tutorial was made with Photoshop CS 2, but I tried to use only the basic tools so people with Photoshop Elements could try this too.
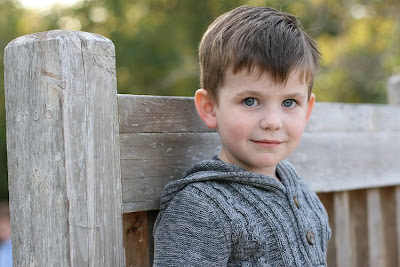
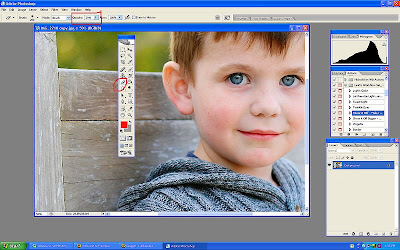
Click on any image to make the screenshot larger and easier to read.Today we are going to edit this picture of Lucas. The image below is straight out of the camera (SOOC) it was taken at 4:30 on an overcast day. The sun is behind and to the right of the subject.
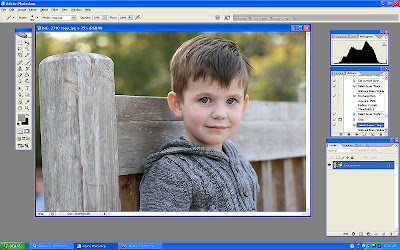
First open the selected file in Photoshop. Your screen should look something like this.
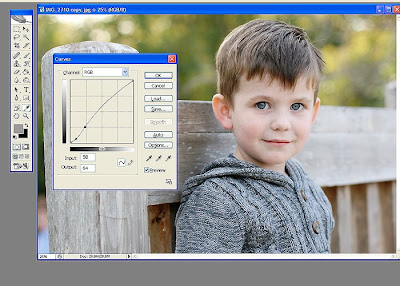
Bring up curves. On a PC you do this by hitting Ctrl and M in conjunction. The gridbox seen below will appear. Place your cursor on the grid and make two points as shown below. Pulling the top dot upwards will make your entire image lighter (adjusting the exposure) pulling the lower dot downwards will make the image have more contrast. Adjust your image until you are happy with the results. This will obviously vary with each image.
Next we are going to adjust to the saturation. First hit Ctrl and J, this will make another layer appear. You can see this in the right bottom corner. We will work with this background layer.
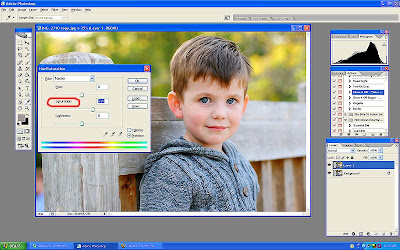
Hit Ctrl and U in conjuntion and the screen shown below will appear. With the middle slider (labeled "Saturation" and circled in red below) pull the point towards the right, this will make all the colors in the image brighter. Adjust until the colors appear natural and true to life.
Now we are going to erase the color off parts of his face that are too bright because shadowed areas show more color then needed with this technique. Click on the eraser (shown in red below) then adjust the opacity of the brush the eraser will use (also shown in red) to about 30%. Erase the color off the ears, hair, nostrils and lips as needed. (When the screenshop was taken, this had already been done.) Now, you will close the layers. Go to the tab at the top of the screen called "Layer" open it and select the option called "Flatten layers".
Now, we are going to make his eyes a little brighter. Click on the "Dodge" tool. Then select "Highlights" from the top dropbox, and set the exposure to 5%. Run your tool over the iris of the eye once or twice. Be very careful not to overdo this! Over use of this technique will make your child look possessed!

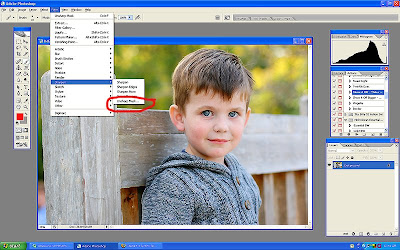
Now, we are going to make the entire image look sharper. Click on the tab called "Filter" then on "Sharpen" and then "Unsharp Mask". (See screenshot.)
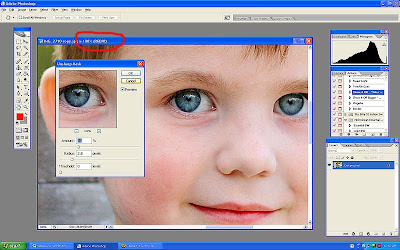
Now blow your entire image up. You can do this by hitting Ctrl and the + button at the same time. Blow your image up to 100%. You will see this value at top of the screen. Now more the sliders for "Amount" and "Radius", move amount to about 100 and radius to about 1.5 (this will vary for individual pictures) at 100% magnification you will be able to tell when you have sharpened too much as the picture will start to look grainy.
Less is more here!!! I have deliberately over sharpened in the screenshot. Once you are done hit OK and then use Ctrl and - to back out of the magnification.
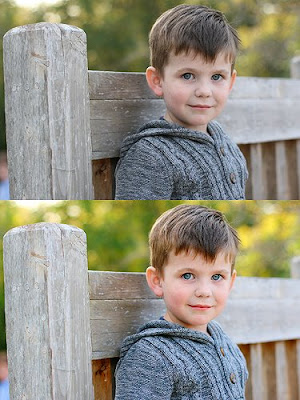
Voila! You are done!
Let me know if any of that was confusing and I will try to simplify it for you!

 Open the image in photoshop. At the top of the screen select "Image" from the drop down menu select "Adjustments" and then "Photo Filter" .
 This window should appear. You'll notice that this image is a bit "warmer" (more orange or gold toned) then the previous image. That's because the top filter is selected and the effect is automatically shown on your image.
 Since we want to remove the excess orange we'll need a cooling filter. There are three cooling filter options, for this image the cooling filter 82 works best. You'll note that the image now looks quite blue.
 It is always better for an image to be warmer rather then cooler. Think about it; healthy humans sometimes have a tan glow, and warm images in the proper setting (sunsets, sun flair) are very appealing. However blueish skin generally denotes oxygen deprivation or coldness, so you'll want to be careful about fixing your images. Less is more! Slide the density slider to the point where the skin looks corrected.
 That's it! You're done with the white balance correction! Easy right?
 Here is the complete edit on the image.


